Banners in Minecraft are not just for decoration; they also provide an exciting way to showcase your creativity. To start crafting a banner, gather 6 wool blocks of the same color and 1 stick, then arrange them in the crafting table’s grid. Once you have your plain banner, use a loom to apply patterns and customize it further. You can add layers of up to six different designs using dyes like Creeper faces or gradient effects. Besides marking territories or decorating your builds, these banners can even serve practical purposes like customizing shields or acting as map indicators. Enjoy exploring all the possibilities!
1. How to Craft a Basic Banner
 Credits: gameleap.com
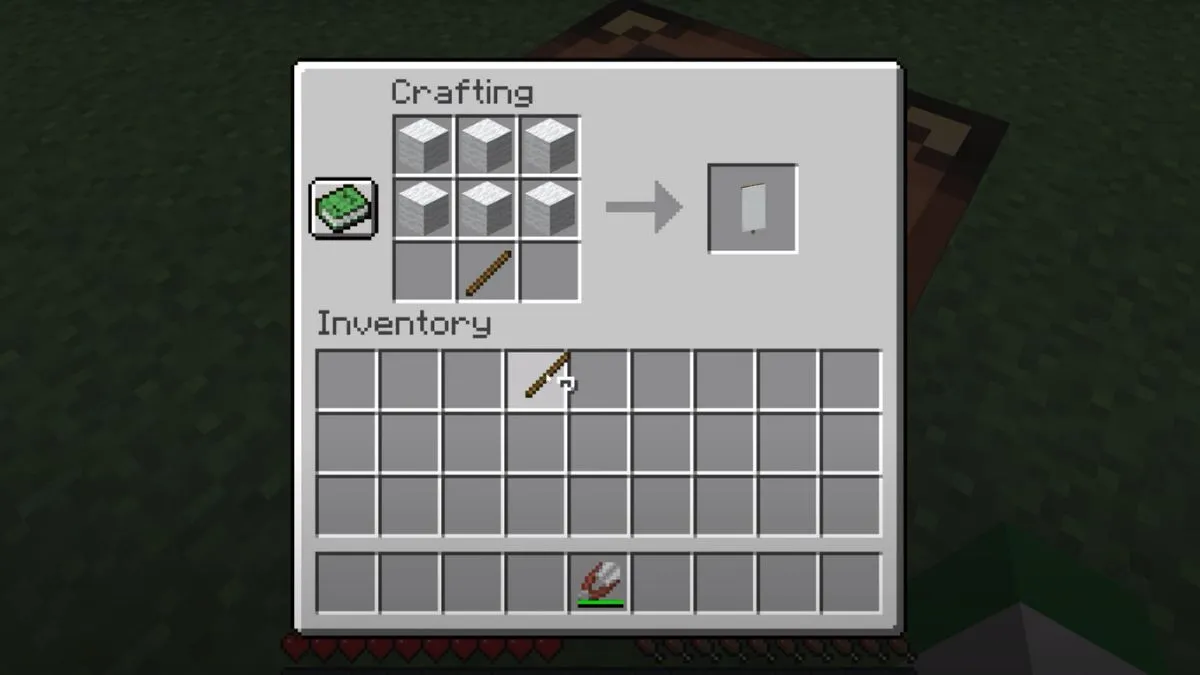
To craft a banner, gather 6 wool blocks of the same color and 1 stick. Open your crafting table to reveal the 3×3 grid. Place the wool blocks in the top two rows, filling all six spots, and put the stick in the middle slot of the bottom row. This arrangement will yield a plain-colored banner. You can choose any color of wool to create a banner that fits your style or theme.
2. Customizing Your Banner with Patterns
 Credits: youtube.com
To make your banner stand out, you can add various patterns using the loom. Once you have your banner, open the loom and place your banner and dye into the respective slots. Each dye you use will allow you to create a different pattern. For instance, if you use a flower, it will create a floral pattern, while using a creeper head will result in a creeper face design. You can layer up to six patterns on a single banner, giving you the freedom to create intricate and personalized designs. For example, by combining different colors and shapes, you can create stripes, gradients, or even symbols that represent your favorite in-game factions. Experiment with various combinations to discover unique looks that reflect your style.
3. Step-by-Step Guide to Using the Loom
 Credits: digminecraft.com
To get started with the loom, first, you need to craft one. For this, gather 2 wooden planks and 2 strings. Once you have the materials, open your crafting table and arrange them to create the loom. After crafting, place the loom down in your world and right-click on it to open its interface.
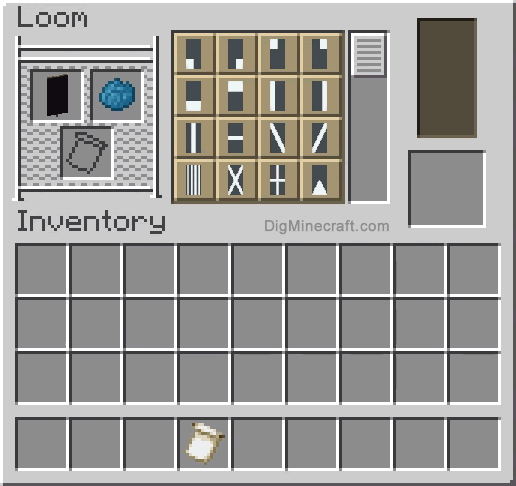
Inside the loom, you will see three slots: the left slot for your banner, the right slot for dye, and a center area that displays the available patterns. Insert your plain banner in the left slot and choose a dye to use in the right slot. You’ll see a preview of the pattern that will be applied. Select the pattern you want to use, and it will be added to your banner.
You can repeat this process to apply multiple patterns. For instance, start with a plain red banner, add a black cross pattern, and then layer a yellow border for a bold design. Remember, you can apply up to six patterns on one banner, giving you plenty of room for creativity. Experiment with different dyes, patterns, and layering techniques to find your unique style.
4. Layering Patterns for Complex Designs
Layering patterns on your banner allows for a stunning level of detail and complexity. You can add up to six different patterns on a single banner, which can transform a simple design into a unique masterpiece. Start with a base color for your banner, then use the loom to add different patterns. For example, begin with a solid color banner and add a diagonal stripe pattern in a contrasting color. After that, you could layer a flower charge pattern on top, followed by a border to frame your design. Remember that each layer can interact with the previous ones, creating shades and textures that add depth. For instance, layering a skull and crossbones over a gradient background can make the image pop. The combination of layering and color mixing can give your banner a professional look.
5. Unique Banner Designs to Try
Creating unique banners can showcase your creativity in Minecraft. Here are some exciting designs to consider:
-
Gradient Sunset: Layer a red dye at the bottom, then orange, and finally yellow at the top to create a beautiful sunset gradient. This can be a great way to brighten up your builds.
-
Geometric Patterns: Use multiple layers of different colors to create triangles or checkerboard designs. For instance, start with a base color, then add a contrasting color in a triangular pattern for a modern look.
-
Nature Themes: Combine various flower designs and colors to create a nature-inspired banner. Using a combination of dyes derived from flowers, you can craft a vibrant, floral pattern that fits well in gardens or park areas.
-
Minimalist Designs: Sometimes less is more. Use a single color with a simple pattern, like a cross or stripes, to make a clean and elegant banner that can complement any structure.
-
Seasonal Themes: Change your banners with the seasons. For example, use green and brown for a fall theme, or red and white for winter holidays. This not only adds fun to your gameplay but also keeps your environment fresh.
-
Striped banner design
- Gradient background using multiple colors
- Geometric patterns for a modern look
- Nature-inspired designs like trees or mountains
- Fantasy themes featuring dragons or castles
- Character symbols from popular games
- Seasonal themes like winter or Halloween
- Custom logos for a personal touch
6. Practical Uses for Banners in the Game
Banners can serve various functional purposes in the game, including:
-
Territory Marking: Use banners to mark your territory or bases, especially in multiplayer servers. This helps players identify ownership and adds a personal touch to your builds.
-
Map Indicators: Place banners in specific locations to act as markers on your map. Simply right-click the banner with the map in hand to create a colored dot that matches the banner’s color.
-
Shield Customization: You can apply a banner design to your shield for unique battle gear. To do this, simply craft a shield with your banner in a crafting table, creating a stylish and recognizable shield.
-
Decorative Elements: Use banners in your builds as decorative curtains, headboards, or signs. Their vertical nature allows for unique placements that can enhance the aesthetics of your structures.
-
Fuel Source: In emergencies, banners can be used as a fuel source in furnaces, smelting 1.5 items per banner.
7. Advanced Tips for Banner Customization
For players looking to take their banner crafting to the next level, consider experimenting with the combination of patterns that reflect your personal style or theme. One advanced technique involves using a single base color and layering different patterns on top. For example, start with a solid blue banner, then add a white border, followed by a red stripe, and finish with a yellow flower pattern. This creates a visually striking banner that stands out.
Another tip is to use color theory to create complementary designs. Choose colors that are opposite each other on the color wheel, like blue and orange, for a vibrant contrast. This can help your banners catch the eye in a world filled with various structures.
Additionally, take advantage of banners’ ability to be placed on walls, fences, and even in item frames. This opens up creative possibilities for decorating your base or creating themed areas. For instance, you might use a series of banners to create a gallery wall, showcasing different designs that represent different aspects of your adventures.
For multiplayer servers, consider coordinating with friends to design banners that reflect your team or faction. Creating a set of banners with a cohesive theme can enhance your group’s identity and make your bases more recognizable. Using unique symbols or colors that represent each player can add a personal touch.
Lastly, for those who enjoy redstone, consider integrating banners into your contraptions. With a bit of creativity, you can create a hidden door that opens with a specific banner pattern or use banners as indicators for different states in your redstone creations. This can add both functionality and flair to your builds.
Frequently Asked Questions
1. What materials do I need to make banners in Minecraft?
To make banners, you need wool of any color and a stick. You also might want dyes to add designs.
2. How can I change the color of my banner in Minecraft?
You can change the banner color by adding different dyes during crafting or using a crafting table.
3. Can I add patterns to my banners in Minecraft?
Yes, you can add patterns using dyes and specific items like flowers, vines, or even magical items.
4. Is it possible to mix colors on my banner?
Absolutely! You can layer different colors and patterns to create unique designs on your banner.
5. Where can I hang my banners in Minecraft?
You can hang banners on blocks, fences, and walls, or place them on a pole for decoration.
TL;DR Learn how to craft and customize banners in Minecraft with this guide, covering everything from basic crafting to advanced tips like layering patterns, unique designs, and practical uses such as territory marking and shield customization.