The Shape Builder Tool in Adobe Illustrator is an essential instrument for designers aiming to refine their creative process. To use it effectively, first find the tool in the Tools Panel or quickly press Shift + M. Begin by merging shapes—select them, activate the tool, and drag across desired areas to combine. If you need to erase parts of a shape, hold Alt or Option while clicking or dragging over those regions. Don’t forget that you can extract specific sections easily just by clicking on them. Practicing with simple shapes will help you get used to its features before tackling more complex designs. Happy designing!
What is the Shape Builder Tool?
The Shape Builder Tool is a feature in Adobe Illustrator that allows users to create complex shapes by combining, extracting, or erasing parts of overlapping shapes. Unlike traditional methods like the Pathfinder panel, this tool offers a more intuitive approach. Designers can easily merge shapes without worrying about the excess anchor points that come with other techniques. For example, if you have a circle and a rectangle overlapping, the Shape Builder Tool lets you drag across the overlapping area to create a new shape, making it a quick and efficient way to manipulate your designs.
Accessing the Shape Builder Tool
 Credits: youtube.com
To get started with the Shape Builder Tool in Adobe Illustrator, you can easily find it in the Tools Panel, typically located on the left side of the workspace. If you prefer keyboard shortcuts for efficiency, simply press Shift + M to select the tool instantly. This quick access allows you to jump right into creating and manipulating shapes without having to navigate through menus.
Basic Operations with the Shape Builder Tool
 Credits: esthernariyoshi.com
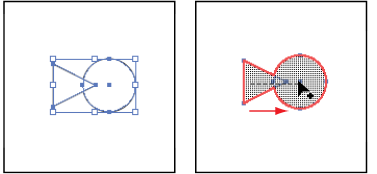
To effectively use the Shape Builder Tool, start by merging shapes. Select the overlapping shapes with the Selection Tool (V), then activate the Shape Builder Tool (Shift + M). Click and drag over the areas you want to combine, and a plus sign will indicate the merge. The new shape will take the fill color of the last selected shape, so choose your colors strategically.
Next, you can erase parts of shapes. With the shapes selected, activate the Shape Builder Tool and hold the Alt key (Windows) or Option key (Mac). Click or drag over the areas you wish to erase; a minus sign will appear to confirm the removal. This allows precise control over your design.
If you want to extract specific sections, select the shapes and activate the Shape Builder Tool. Click on the area you want to keep, and you can click multiple areas at once to extract them. This is helpful when you only need certain parts of your design.
The Shape Builder Tool also works with paths and line segments. Hold the Alt or Option key to trim unnecessary paths, making it easier to clean up freehand drawings. This versatility allows you to enhance your designs with minimal effort.
| Operation | Step 1 | Step 2 | Step 3 | Tip |
|---|---|---|---|---|
| Merging Shapes | Select the overlapping shapes you wish to merge using the Selection Tool (V). | Activate the Shape Builder Tool (Shift + M). | Click and drag across the areas you want to combine. | The newly created shape will inherit the fill color of the last selected shape. Make sure to select your colors accordingly. |
| Erasing Shapes | Select the overlapping shapes with the Selection Tool (V). | Activate the Shape Builder Tool (Shift + M). | Hold the Alt key (Windows) or Option key (Mac) and click or drag over the areas you want to erase. | This feature acts like an eraser, allowing for precise control over which parts of your design are removed. |
| Extracting Shapes | Select the overlapping shapes with the Selection Tool (V). | Activate the Shape Builder Tool (Shift + M). | Simply click on the area you wish to extract. You can click multiple areas to extract them simultaneously. |
Merging Shapes
 Credits: agitraining.com
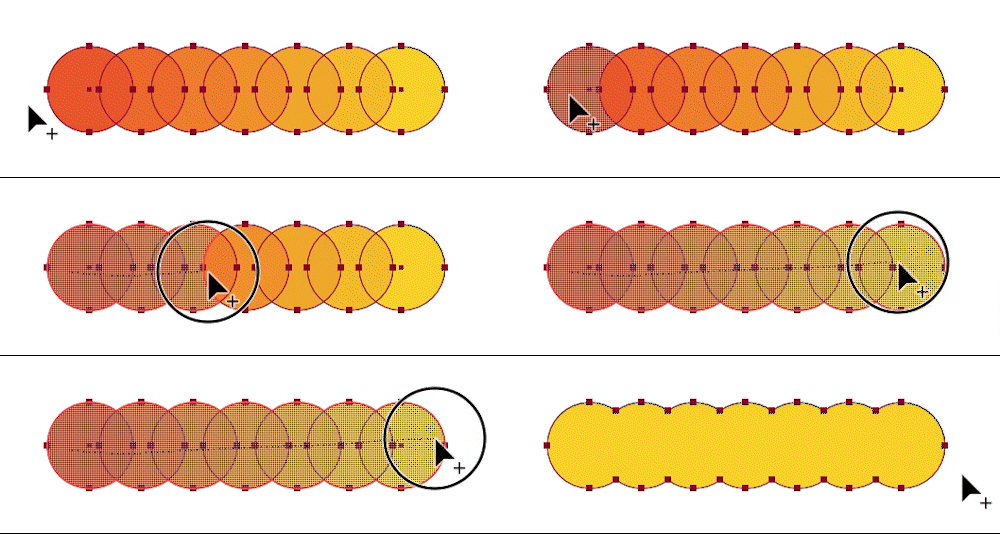
Merging shapes with the Shape Builder Tool is straightforward and allows for greater creativity in design. To begin, select the overlapping shapes you want to merge using the Selection Tool. Once selected, activate the Shape Builder Tool by pressing Shift + M. You will notice a cursor change that indicates the tool is ready. Now, click and drag across the areas you wish to combine. A plus sign will appear, showing that those regions are set to merge into a single shape.
For example, if you have two overlapping circles and you want to create a new shape that combines them, simply drag across the intersection. The newly formed shape will take on the fill color of the last shape you selected, so it’s wise to plan your color selection beforehand.
This merging process not only enhances your design but also simplifies it by reducing the number of anchor points, allowing for smoother editing and adjustments later on. Additionally, if you find that you want to merge multiple overlapping shapes at once, the Shape Builder Tool allows you to do this in one motion, creating a more efficient workflow.
Erasing Shapes
 Credits: youtube.com
To erase shapes using the Shape Builder Tool, start by selecting the overlapping shapes with the Selection Tool (V). Once selected, activate the Shape Builder Tool by pressing Shift + M. To remove specific areas, hold down the Alt key (on Windows) or the Option key (on Mac) and click or drag over the regions you want to erase. A minus sign will appear, confirming that those areas will be removed. This method gives you precise control over which parts of your design are deleted, making it easier to refine your artwork. For instance, if you have overlapping circles and want to create a crescent shape, simply erase the unwanted parts with this tool.
Extracting Shapes
 Credits: vectorstyler.com
Extracting shapes with the Shape Builder Tool is straightforward and allows for precise control over your design. To begin, select the overlapping shapes you want to work with using the Selection Tool (V). Once selected, activate the Shape Builder Tool by pressing Shift + M. You can then click directly on the area you wish to extract. If you want to extract multiple areas at once, simply continue clicking on those sections. This feature is particularly useful when you only need certain parts of your design, enabling you to isolate and use them in other projects or compositions. For example, if you have a complex illustration and want to highlight a specific pattern, you can easily extract just that pattern using this tool. Remember that the extracted shapes will become separate objects, which you can manipulate individually later.
Working with Paths and Line Segments
 Credits: esthernariyoshi.com
The Shape Builder Tool is not just for merging and erasing shapes; it can also be used effectively with paths and line segments. This feature is particularly helpful for cleaning up freehand drawings or complex illustrations where you might have overlapping lines. For instance, if you have drawn a shape with a pen tool that includes extra paths you don’t need, you can use the Shape Builder Tool to simplify your design. By selecting the paths, you can hold the Alt or Option key and click on the unnecessary segments to remove them. This allows you to maintain a cleaner design without excessive anchor points. Additionally, you can create new shapes by combining line segments. Just select the paths you want to work with and use the Shape Builder Tool to connect them, forming a new shape that suits your design needs.
Advanced Techniques
 Credits: youtube.com
One advanced technique is to use layering strategically while working with the Shape Builder Tool. By placing shapes on different layers, you can easily isolate and manipulate them without disturbing other elements in your design. For example, create a complex design where the foreground shapes are on one layer and the background shapes are on another. This way, you can utilize the Shape Builder Tool on the foreground without affecting the background.
Another effective method is to integrate the Shape Builder Tool with the Direct Selection Tool. After creating a shape, you can switch to the Direct Selection Tool to fine-tune the anchor points and paths of the newly formed shape. This allows for greater control over the final appearance of your design. For instance, if you notice that a corner of a merged shape needs to be rounded or adjusted, you can easily select that anchor point and modify it directly.
Additionally, using the Shape Builder Tool in conjunction with gradients can yield stunning effects. After merging shapes, apply different gradient fills to create depth and dimension. Just remember to select the shape first, then apply the gradient. This technique is particularly useful in logo design, where adding subtle gradients can enhance the overall aesthetic without overwhelming the simplicity of the design.
Finally, consider using the Shape Builder Tool alongside clipping masks. You can create intricate designs by first forming the base shapes and then using the Shape Builder Tool to refine the areas that should be visible or hidden. This combination can be particularly effective when creating complex patterns or textures. By harnessing these advanced techniques, you can maximize the potential of the Shape Builder Tool and elevate your design work.
Combining Modes
 Credits: esthernariyoshi.com
When using the Shape Builder Tool, combining modes allows for seamless transitions between merging, erasing, and extracting shapes. To switch between these functions, simply hold down the Alt key (Windows) or Option key (Mac) while you work. For example, if you’re merging shapes but decide you need to erase part of the merged area, just press and hold Alt or Option and click on the area you want to remove. This flexibility can save time and keep your workflow fluid. You can even extract specific shapes while merging others by quickly toggling between the modes. Mastering this will enable you to create more intricate designs without having to constantly switch tools.
Using Rectangular Marquee
The Rectangular Marquee tool can significantly enhance your efficiency when using the Shape Builder Tool. By holding the Shift key while dragging, you create a selection box that allows you to select multiple areas at once. This is especially useful for larger designs or when you need to merge or erase several sections quickly. For example, if you’re working on a complex illustration with various overlapping shapes, instead of clicking each area individually, you can draw a rectangle around them. This speeds up the process and helps maintain a cleaner workflow. Remember, the rectangular selection can be adjusted, so don’t hesitate to refine your selection for better accuracy.
Best Practices
 Credits: labelvalue.com
To make the most of the Shape Builder Tool, start by practicing with simple shapes. This will help you understand how merging and erasing work without getting overwhelmed by complexity. Keeping your layers organized is also essential; group similar shapes together so you can select and manipulate them easily. Don’t hesitate to experiment with different shapes and combinations. The tool is designed to be versatile, allowing you to discover unique and creative design solutions. For example, try combining circles and rectangles to see what interesting shapes you can create. This hands-on approach will enhance your design skills and make you more comfortable using the tool.
- Familiarize yourself with the Shape Builder Tool workspace.
- Use the tool in combination with the Pathfinder panel for more complex shapes.
- Practice with different shapes to understand how the tool interacts with them.
- Combine shapes effectively to enhance your design composition.
- Be mindful of your layering to avoid unintentional shape merging.
- Experiment with color fills to see how they affect visible shapes.
- Use shortcut keys to increase your efficiency while working.
Practice with Simple Shapes
 Credits: lam-ictm.weebly.com
To effectively use the Shape Builder Tool, start practicing with simple shapes like circles, squares, and triangles. This will help you get comfortable with how the tool works. For example, draw two overlapping circles and use the Shape Builder Tool to merge them into a single shape. As you click and drag over the intersection, you’ll see a new shape form.
You can also practice erasing parts of shapes. Create a rectangle and a triangle that overlap, then use the Alt/Option key to remove the triangle’s portion that extends outside the rectangle. This hands-on experience will help you understand the tool’s functionality better.
By starting with basic shapes, you can build your confidence. Once you’re familiar with the tool, you can move on to more complex designs, applying the same principles you learned with simpler forms.
Layer Management
 Credits: youtube.com
Effective layer management is crucial when using the Shape Builder Tool. Start by organizing your layers logically; group similar shapes together to simplify selection and manipulation. For example, if you are creating a logo, consider having one layer for the background shapes and another for foreground elements. This way, you can easily hide or lock layers that you are not currently working on, reducing the risk of accidental modifications.
Use clear and descriptive names for your layers. Instead of leaving them as Layer 1, Layer 2, etc., rename them according to their function, such as ‘Background Shapes’ or ‘Foreground Elements.’ This practice will save you time and help you navigate your design more efficiently, especially in complex projects.
Additionally, take advantage of layer colors. Assign different colors to various layers to visually distinguish them in the Layers panel. This makes it easier to select and work with specific elements when using the Shape Builder Tool.
Finally, remember to regularly clean up your layers by deleting any unnecessary ones. This not only streamlines your workflow but also minimizes confusion as your project evolves.
Experiment
 Credits: creativepro.com
Experimenting with the Shape Builder Tool is key to unlocking its full potential. Start by combining different shapes in unexpected ways. For instance, try overlapping circles and rectangles to see how their intersections create new forms. Use various colors for each shape; this will help you visualize the areas that will merge or erase. You can also play with the erasing function to create abstract designs. Don’t hesitate to mix simple shapes with more complex ones, as this can lead to unique combinations that spark creativity. Additionally, explore how the tool interacts with gradients and patterns; you might discover striking effects that enhance your designs. Remember, the more you experiment, the more comfortable you’ll become with the tool, allowing you to see possibilities that may not have been obvious at first.
Frequently Asked Questions
1. What is the Shape Builder Tool in Adobe Illustrator?
The Shape Builder Tool lets you easily create new shapes by combining and editing existing ones in Adobe Illustrator.
2. How can I access the Shape Builder Tool?
You can find the Shape Builder Tool in the toolbar on the left side of the screen or by pressing Shift + M on your keyboard.
3. Can I use the Shape Builder Tool with complex shapes?
Yes, it works well with both simple and complex shapes, allowing you to combine or remove parts as needed.
4. What should I do if the Shape Builder Tool is not working?
Make sure you have two or more shapes selected; the tool only works when multiple shapes are chosen.
5. Are there any tips for making the best use of the Shape Builder Tool?
Yes, try grouping shapes first, using the option key to subtract shapes, and experimenting with different combinations to discover unique designs.
TL;DR The Shape Builder Tool in Adobe Illustrator allows users to create complex shapes from simpler ones by merging, erasing, or extracting parts of overlapping shapes. Access the tool via the Tools Panel or by pressing Shift + M. Use it to efficiently combine or remove shapes with intuitive controls, such as holding the Alt/Option key to erase. Best practices include starting with simple shapes, managing layers, and experimenting with various designs. Mastering this tool can significantly enhance your design workflow and creativity.

