Creating a user interface (UI) design application involves several steps that are crucial for ensuring both aesthetics and usability. First, conducting user research helps understand the target audience through surveys and interviews, which guide the design process. Next, defining clear objectives ensures that your application aligns with user needs. Afterward, wireframing lays out the structure of your UI for better visualization and stakeholder input. Once that’s done, you move on to visual design where branding elements like color palettes come into play. Prototyping allows interactive testing before final adjustments based on feedback enhance usability as you prepare for development handoff to developers effectively.
1. Conducting User Research
 Credits: blitzllama.com
User research is the cornerstone of effective UI design. It helps you gather insights about your target audience, ensuring your design meets their needs. Start by conducting surveys to collect quantitative data on user preferences. For instance, you might ask respondents about their favorite apps and what features they find most useful. Next, hold interviews to delve deeper into user motivations and frustrations, providing qualitative insights that surveys might miss. For example, understanding why a user prefers one app over another can reveal essential design considerations. Additionally, perform competitor analysis to benchmark against similar applications. Identify what works well and where users face challenges. This analysis can guide your design choices and help you avoid common pitfalls. Creating user personas based on this research is essential; these fictional characters represent your ideal users, keeping your design user-centered throughout the process.
2. Defining Clear Objectives
Defining clear objectives is a crucial step in the UI design process. Start by identifying the key features and functionalities that the application must have. For example, if you’re designing a fitness app, objectives might include tracking workouts, offering nutrition advice, and providing social sharing options. Next, establish measurable goals that will guide your design decisions. This could involve setting targets such as reducing the number of clicks needed to complete an action or improving the onboarding time for new users. It’s important that these objectives align not only with user needs but also with overarching business goals. For instance, if user engagement is a priority, you might focus on features that encourage daily use, such as reminders or gamification elements. By clearly defining these objectives, you create a focused roadmap that can drive your design process and help keep the project on track.
3. Creating Wireframes
 Credits: flux-academy.com
Wireframing is a crucial step in the UI design process, as it lays the foundation for how users will interact with your application. It involves creating simple, low-fidelity layouts that focus on the placement of elements without getting bogged down in details like colors or fonts. This allows you to visualize the overall structure and flow of the UI, making it easier to organize content and functionality.
When creating wireframes, think about the user journey. Start by sketching the main screens, such as the home page, product pages, and any other key areas of your application. Use boxes and simple shapes to represent buttons, images, and text blocks. This will help you prioritize which elements are most important and how they should be arranged to guide users through their tasks.
Collaboration is key during this phase. Share your wireframes with team members and stakeholders to gather feedback. This is an ideal time to make adjustments based on input, ensuring that the design aligns with user needs and expectations. Tools like Balsamiq, Sketch, and Adobe XD can facilitate this process, allowing for quick edits and easy sharing.
Remember that wireframes are not set in stone; they are a tool for exploration. As you iterate, continue to refine your wireframes based on feedback, and be open to revisiting your initial ideas. This flexibility can lead to a more effective final design that enhances user experience.
4. Developing Visual Design
In the visual design phase, you transform wireframes into appealing and functional designs. Start by creating a mood board that captures the visual essence you want for your application. This should include images, colors, textures, and typography that resonate with your brand identity. Next, select a color palette that not only fits your brand but also enhances usability. For instance, contrasting colors can help important buttons stand out. Typography is equally important; choose fonts that are readable and align with your brand voice. After establishing these elements, create high-fidelity mockups by refining your wireframes with detailed designs. This step is where your application begins to take on its personality. Ensure that your designs are coherent and maintain a consistent style. For example, if you use rounded buttons in one part of your app, stick to rounded buttons throughout. This attention to detail in visual design helps create a polished experience that resonates with users.
5. Building Prototypes
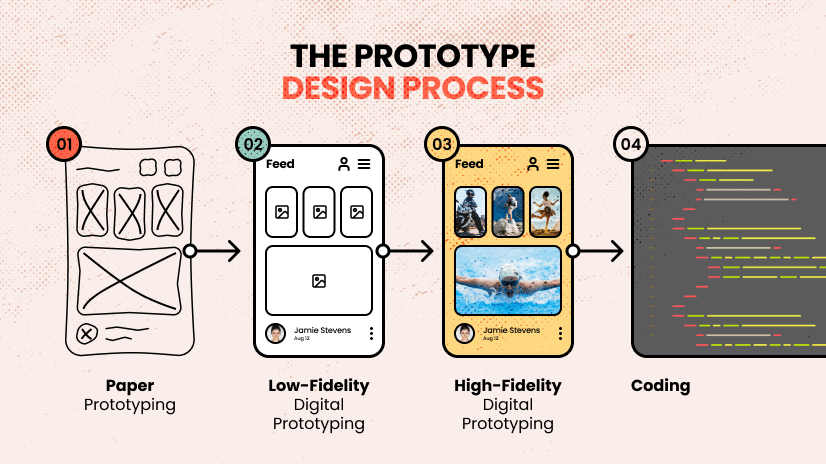 Credits: htmlburger.com
Prototyping is a vital step in the UI design process, allowing designers to create interactive models of their designs before full development begins. This stage is crucial for testing the functionality and flow of the application, providing a tangible way to visualize how users will interact with the interface. It helps identify potential issues early on, which can save time and resources later. For instance, using tools like Figma or InVision, designers can simulate user interactions, making it possible to see how buttons respond, how screens transition, and how users navigate through the application. Additionally, prototypes can be shared with team members and stakeholders for feedback, facilitating discussions that can lead to improvements. Engaging real users during this phase by conducting usability tests can yield invaluable insights, helping to refine the design based on actual user behavior and preferences.
6. Testing and Iterating
Testing your designs is crucial for creating a user-friendly application. Start by conducting usability tests with real users. This allows you to observe how they interact with your interface, identifying any pain points or confusion they may experience. For instance, if users struggle to find a specific feature, you might need to reconsider its placement or visibility in your design.
After gathering feedback, iterate on your designs. This means making changes based on user insights, whether that involves tweaking the layout, adjusting colors, or simplifying navigation. It’s common to go through multiple rounds of testing and iteration. Each cycle brings you closer to a design that resonates with users and meets their needs effectively. Tools like UserTesting or Maze can facilitate this process by allowing you to gather feedback quickly and efficiently.
7. Preparing for Development Handoff
Preparing for development handoff is a crucial step that ensures a smooth transition from design to development. Start by compiling a comprehensive set of design specifications that outline each element of the UI. This should include dimensions, colors, fonts, and spacing details. Using tools like Zeplin or Avocode can help streamline this process by allowing designers to export assets and measurements directly to developers.
Next, create a style guide that documents the visual and interaction design elements. This guide serves as a reference for developers, ensuring consistency throughout the application. It should include components such as buttons, input fields, and navigation menus, along with guidelines on how to use them effectively.
Effective communication is essential during this phase. Schedule meetings with the development team to discuss the design specifications and address any questions they may have. This collaboration helps to clarify the design intent and reduces the likelihood of misunderstandings.
Consider providing interactive prototypes as part of the handoff. This allows developers to experience the design in action, making it easier for them to understand the user flow and interactions. Overall, a well-prepared handoff can significantly enhance the development process and lead to a final product that aligns closely with the original design vision.
8. Best Practices for Effective UI Design
Maintaining consistency is vital in UI design. Use similar colors, fonts, and button styles throughout your application to create a seamless experience for users. For instance, if you choose blue for your primary action button, keep that color for all primary buttons across different screens.
Designing for accessibility is also crucial. This means ensuring your application can be used by everyone, including those with disabilities. Follow WCAG (Web Content Accessibility Guidelines) to make sure your text is readable, images have alt text, and your navigation is keyboard-friendly.
Keeping your design simple helps users focus on essential tasks. Avoid clutter by removing unnecessary elements that can distract users. For example, a clean interface with clear call-to-action buttons will guide users more effectively than one filled with excessive graphics and text.
Effective use of white space can enhance readability and highlight key features. Don’t be afraid of empty space; it can make your design more appealing and easier to navigate. Think of it as breathing room for your content.
Staying updated with design trends is essential. The digital world evolves rapidly, and being aware of new styles and user preferences can keep your designs fresh. For example, incorporating dark mode options and micro-interactions can improve user engagement.
- Prioritize user-centered design
- Maintain consistency across elements
- Use whitespace effectively
- Ensure accessibility for all users
- Optimize for mobile and desktop
- Incorporate feedback from user testing
- Stay updated with design trends and tools
9. Essential Tools for UI Design
Choosing the right tools for UI design can significantly enhance your workflow and improve the quality of your final product. Here are some essential tools that can help you at various stages of the UI design process.
Wireframing Tools: Balsamiq and Sketch are popular choices for creating wireframes. Balsamiq offers a user-friendly interface that allows for quick sketches of your layout, while Sketch provides more flexibility and features for detailed designs.
Prototyping Tools: Figma, InVision, and Axure RP are excellent for building interactive prototypes. Figma stands out for its real-time collaboration features, which are great for teams. InVision allows you to turn your static designs into clickable prototypes, making it easier to test user flows.
Design Collaboration Tools: Tools like Zeplin and Avocode facilitate the handoff between designers and developers. They help in sharing design specifications and assets, ensuring that everyone is on the same page.
User Testing Tools: Platforms such as UserTesting and Maze allow you to gather feedback from real users. These tools help you understand how your audience interacts with your design, enabling you to make informed adjustments.
Using the right combination of these tools can streamline your design process, enhance collaboration, and ultimately lead to a better user experience.
| Tool Type | Examples |
|---|---|
| Wireframing Tools | Balsamiq, Sketch, Adobe XD |
| Prototyping Tools | Figma, InVision, Axure RP |
| Design Collaboration Tools | Zeplin, Avocode |
| User Testing Tools | UserTesting, Maze |
Frequently Asked Questions
1. What are the first steps to start designing a UI application?
The first steps include defining your application’s purpose, knowing your target users, and researching similar apps for inspiration.
2. How do I choose the right tools for UI design?
You should consider tools that match your skill level and project needs—popular options include Sketch, Adobe XD, and Figma.
3. What should I focus on when creating wireframes for my app?
Focus on the layout, user flow, and functionality—this helps in visualizing how users will interact with your app.
4. How can I improve the usability of my UI design?
To improve usability, keep your design simple, use clear navigation, and conduct user testing to get feedback.
5. What are some common mistakes to avoid in UI design?
Avoid cluttered designs, inconsistent styles, and ignoring user feedback, as these can hinder the user experience.
TL;DR This article outlines essential steps for developing an initial UI design application, starting with user research to understand the audience, defining clear design objectives, and creating wireframes. It then moves into visual design, prototyping, testing with users, and preparing for development handoff. Best practices such as maintaining consistency and designing for accessibility are highlighted, along with essential tools for each phase of the process. Following these guidelines ensures a user-friendly and appealing final product.