Maintaining an efficient HVAC system requires a careful review of your home’s duct arrangement. First, it’s essential to understand the types of ductwork available, like flexible, metal, and fiberglass ducts, as each affects airflow in different ways. Begin by evaluating airflow requirements based on your system’s cooling capacity; this will guide you in assessing the sizing of both supply and return ducts. It’s important to check for restrictions or leaks that can hinder performance—look for discoloration around joints as a warning sign. Additionally, proper insulation is key in maintaining air temperature during transport. Finally, reviewing the duct layout can identify potential areas for improvement and ensure balanced airflow throughout your home. Regular maintenance is crucial to keep everything running smoothly and to save on energy bills over time.
Understanding Ductwork Basics
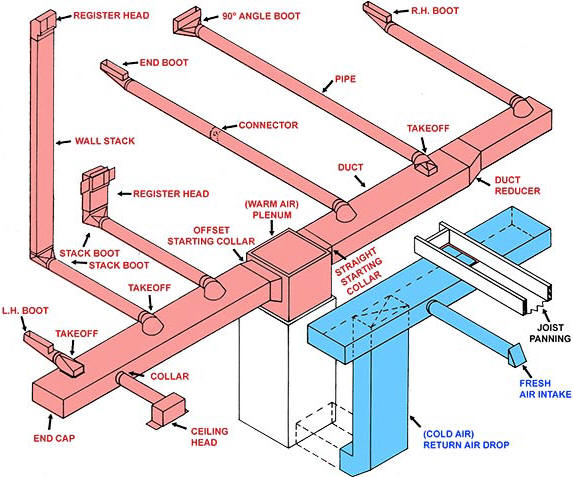 Credits: hamiltonhomeproducts.com
Ductwork is essential in any residential HVAC system, acting as the passage for conditioned air to flow into different areas of your home. Its design and material significantly influence not only the efficiency of heating and cooling but also the overall air quality. For example, if ducts are too small for the airflow required, it can result in uneven temperatures and increased energy costs. Conversely, oversized ducts may lead to wasted energy and noise issues. It’s important to understand the different types of ductwork available, such as flexible, metal, and fiberglass, each having its own pros and cons. Flexible ducts are easier to install in tight spaces but may hinder airflow, while metal ducts last longer and have better air quality properties. Fiberglass ducts are great for insulation but can pose air quality issues if not sealed properly. A thorough understanding of these ductwork basics will help you identify potential issues and improve your home’s HVAC performance.
Types of Ductwork
Ductwork comes in various types, each with unique characteristics and applications. Flexible ducts are popular for their easy installation and ability to fit into tight spaces, making them ideal for retrofitting in existing homes. However, they can create more resistance to airflow due to their bends and twists. On the other hand, metal ducts, usually made from galvanized steel or aluminum, are durable and less likely to collect dust or mold, but they require more precise handling during installation. Fiberglass ducts are excellent for insulation properties, helping to maintain temperature, but they must be sealed properly to prevent fiber release into the air, which can affect indoor air quality. Each type of ductwork has its pros and cons, so it’s essential to consider your home’s specific needs and layout when choosing the right option.
Evaluate Airflow Requirements
 Credits: evolutionmechanical.net
To effectively assess the airflow in your HVAC system, begin by calculating the total airflow needs based on your system’s cooling capacity. A standard guideline is to allocate about 400 CFM (Cubic Feet per Minute) for each ton of cooling. For example, if you have a 3-ton system, you would expect approximately 1200 CFM of airflow. It’s essential to cross-check this airflow requirement with the actual performance of your ductwork. You can do this by measuring the airflow at different points using an anemometer or by consulting with a professional. Comparing the measured airflow against the required CFM will help you identify areas where your ductwork may be underperforming. If you find discrepancies, it may indicate that ducts are either too small or restricted, requiring adjustments or even redesigning sections of the duct system to ensure proper air distribution throughout your home.
Assess Duct Sizing
To assess duct sizing, start with the duct size charts that correlate duct diameter with airflow capacity at a specific friction rate. This will help you determine if the ducts are appropriately sized for the HVAC system’s requirements. For instance, if your system requires 1400 CFM, ensure that the combined area of your supply ducts can handle this volume without restriction. Measure the diameter of each supply duct and calculate the total airflow they can provide.
Next, check the return ducts in the same manner. These ducts should also be capable of handling the air needed to return to the system for reconditioning. If any duct is undersized, it can create bottlenecks, leading to reduced efficiency and comfort.
Don’t forget to evaluate the branch runouts serving each register. These runouts should be properly sized as well, as undersized runouts will restrict airflow to individual rooms, causing uneven temperatures and discomfort. For example, if you have a room that always feels stuffy, it could be due to a runout that is too small to deliver adequate airflow.
| Duct Type | Diameter (inches) | Total Airflow (CFM) | Meets Airflow Requirements? |
|---|---|---|---|
| Supply Ducts | 6 | 350 | No |
| Supply Ducts | 8 | 600 | Yes |
| Return Ducts | 10 | 1000 | Yes |
| Branch Runouts | 4 | 150 | No |
| Branch Runouts | 6 | 300 | Yes |
Check for Restrictions and Leaks
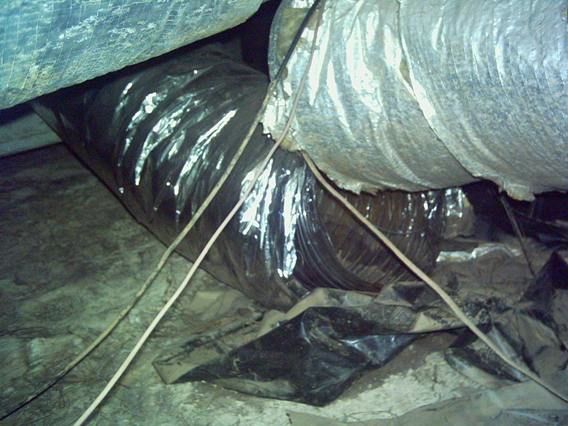 Credits: energyvanguard.com
Inspecting your ductwork for restrictions and leaks is a critical step in maintaining an efficient HVAC system. Begin by visually examining the ducts for any visible gaps, holes, or loose connections. Common indicators of leaks include dust accumulation around duct joints and areas where the insulation appears to be disturbed or missing. You can also perform a simple smoke test: use a smoke pen or incense stick near the joints; if the smoke is drawn into the duct, you have a leak.
To seal leaks, use mastic sealant or specialized duct tape designed for HVAC systems. Avoid regular duct tape, as it may not hold up over time. After sealing, consider checking the airflow using a manometer or an airflow meter to ensure that the repairs have improved performance.
Additionally, ensure that there are no obstructions within the ducts. Items such as debris, dust bunnies, or even small animals can restrict airflow and reduce system efficiency. Regular cleaning of the ducts, ideally once every few years, can help maintain good air quality and performance. Remember, even small leaks can lead to significant energy loss, so it’s essential to address any issues promptly.
- Inspect duct joints for gaps or loose connections
- Check for visible signs of wear or damage
- Look for blockage from insulation, dust, or debris
- Use a smoke pencil to test for leaks
- Measure static pressure to evaluate airflow restrictions
- Ensure vents are unobstructed and properly positioned
- Examine the condition of duct hangers and support brackets
Consider Duct Insulation
Proper duct insulation is crucial for maintaining energy efficiency and comfort in your home. Ducts that run through unconditioned spaces, like attics or basements, can lose significant amounts of heated or cooled air if they are not adequately insulated. This can lead to higher energy bills and uneven temperatures in different rooms. Insulation helps to keep the air at the desired temperature as it travels through the ducts. Ideally, duct insulation should have an R-value of R-6 or higher, depending on your local climate. For example, in colder climates, thicker insulation is necessary to prevent heat loss, while warmer areas may require less. Additionally, inspect insulation for damage, such as tears or compressions, which can reduce its effectiveness. Properly insulated ducts not only improve system efficiency but also contribute to better indoor air quality by reducing the risk of condensation and mold growth.
Review Duct Layout
When reviewing the duct layout, start by ensuring that the design promotes efficient airflow. Avoid sharp bends in the ducts, as these can create resistance, slowing down the air movement and reducing system efficiency. Instead, aim for long, gradual bends that allow air to flow smoothly.
Minimizing the number of fittings is also crucial; each fitting can add resistance and impede airflow. For example, if a duct has multiple elbows, consider redesigning it to have fewer turns, which can enhance the overall airflow performance.
Placement of supply vents is another key factor. Vents should be positioned to distribute air evenly throughout the room, avoiding obstructions like furniture or curtains that can block airflow. A well-placed vent can help maintain a consistent temperature across spaces.
Lastly, consider the layout in relation to the home’s design. For instance, in a two-story house, ensure that the ducts are configured to deliver adequate airflow to both levels, especially in rooms that may need more heating or cooling, like bedrooms or living areas.
Evaluate System Performance
After reviewing the ductwork, it’s crucial to evaluate the overall performance of your HVAC system. Start by ensuring that the airflow is balanced throughout your home. You can do this by using manual or automatic dampers to adjust the airflow to different rooms. For instance, if a particular room feels warmer than others, you might need to reduce airflow to that area or increase it to cooler rooms.
Next, keep an eye on your energy consumption. A significant increase in your energy bills could indicate inefficiencies within your duct system. For example, if you notice that your energy costs rise sharply during peak seasons, it may be time to reassess your ductwork and HVAC performance.
You should also conduct regular performance checks. This can include monitoring the temperature differential between the supply and return vents. A significant variance could suggest that your system is not operating efficiently. If your HVAC system struggles to maintain the desired temperature, it could be a sign of ductwork issues needing immediate attention.
Schedule Regular Maintenance
Regular maintenance of your HVAC system and ductwork is essential for ensuring long-term efficiency and preventing costly repairs. Schedule inspections at least once a year, ideally before the heating or cooling season begins. During these inspections, professionals can check for leaks, clean ducts, and assess the overall condition of the system.
For example, if you notice that certain rooms are not receiving adequate airflow, a technician can adjust dampers or clean out any blockages. This proactive approach not only enhances comfort but can also lead to energy savings. Neglecting maintenance can result in reduced system performance and higher energy bills, as well as a shorter lifespan for your HVAC equipment. Keeping a maintenance log can help track service dates and remind you when it’s time for the next check-up.
Frequently Asked Questions
1. What should I look for when inspecting an HVAC duct system?
When inspecting an HVAC duct system, check for proper airflow, ensure there are no leaks in the ducts, and look for insulation that is in good condition. Also, verify the ducts are properly connected and that there are no blockages.
2. How can I tell if my ducts are poorly arranged?
Signs of poorly arranged ducts include uneven temperatures in different rooms, strange noises from the ducts, and high energy bills. If some areas are too hot or too cold, it may indicate a duct arrangement issue.
3. What are the common types of duct arrangements?
Common duct arrangements include trunk and branch systems, radial systems, and ductless mini-split systems. Each type has its own method of airflow distribution throughout the home.
4. How does duct size affect my HVAC system’s performance?
Duct size is crucial because if the ducts are too small, they can restrict airflow, leading to inefficiency and potential damage to the HVAC system. Conversely, ducts that are too large can cause air to move too slowly.
5. What maintenance should I perform on my HVAC ducts?
Regular maintenance for HVAC ducts includes cleaning to remove dust and debris, checking for and sealing any leaks, and inspecting insulation. This helps ensure efficient operation and improves air quality.
TL;DR Efficiently review your residential HVAC duct arrangement by understanding ductwork basics, evaluating airflow requirements, assessing duct sizing, checking for restrictions and leaks, considering duct insulation, reviewing duct layout, evaluating system performance, and scheduling regular maintenance. Proper assessment and maintenance lead to improved energy efficiency, comfort, and indoor air quality.